The incident
My yearly Minecraft phase hit recently so I decided to revive my SMP, only to witness a string of events resulting in world save destruction:
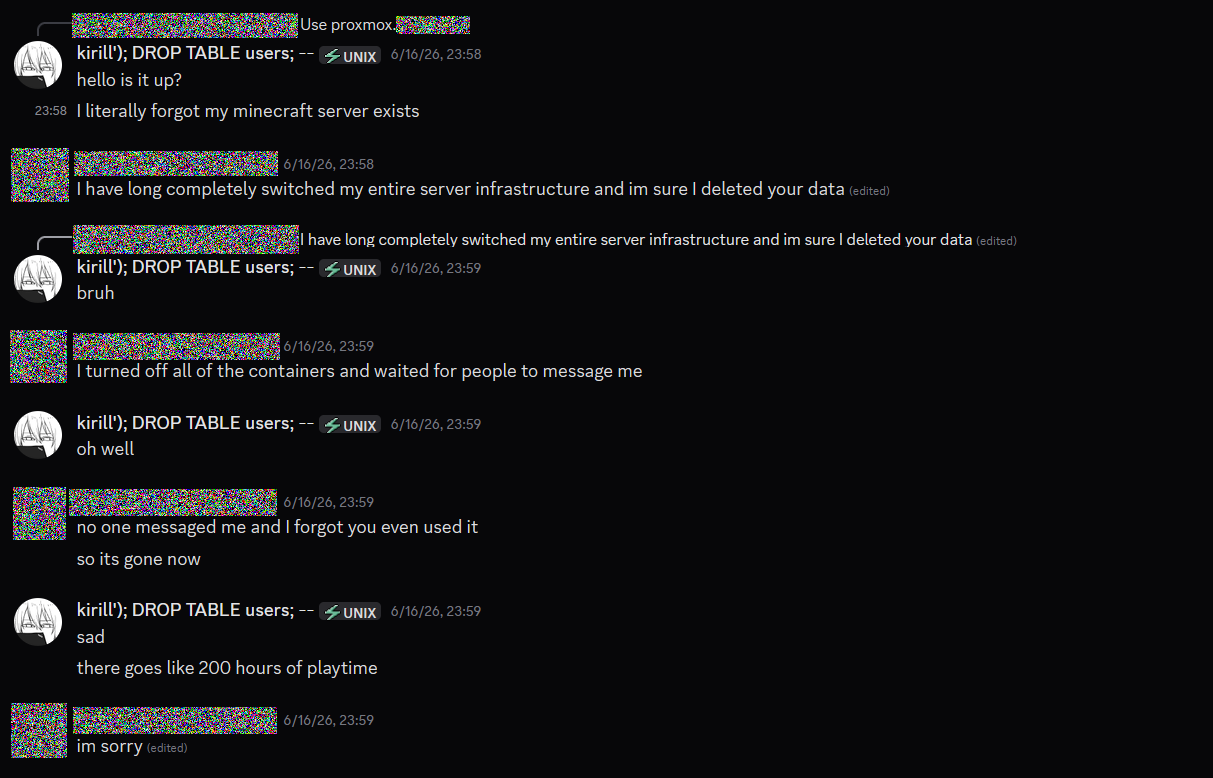
Now, I don't blame the hoster, especially because I happened to have made a world backup a week before we started playing. The only thing changing is the place the server's going to be hosted
Moving it home
For context, earlier this year I built a home server (a big homelab wannabe, maybe a real homelab); up until recently it was mostly idle - just hosting a Jellyfin instance, Transmission daemon and a WireGuard client to not expose HTTP traffic to the internet... so a pretty good candidate for a Minecraft server isn't it?
Home IP exposure
I hate having my home be DDoS'ed into oblivion so it seems like a good idea to hide it behind a reverse-proxy. So I got a VPS and set up fatedier/frp on it. It might be weird to pay money for stuff like this, but I already got a physical server, so why not shove some more into a hosting provider?
Installing FRP
NOTE: should be done on both homelab and VPS.
NOTE: latest verison can differ. If you're doing it from Russia, get ready to fiddle with proxying because GitHub is blocked for some reason...
wget https://github.com/fatedier/frp/releases/download/v0.61.0/frp_0.61.0_linux_amd64.tar.gz
tar -xzf frp_0.61.0_linux_amd64.tar.gz
mv frp_0.61.0_linux_amd64/frpc /usr/local/bin/
mv frp_0.61.0_linux_amd64/frps /usr/local/bin/
Systemd units
Homelab/client
Create and edit /etc/systemd/system/frpc.service:
[Unit]
Description=FRP Client
After=network-online.target
Wants=network-online.target

[Service]
Type=simple
ExecStart=/usr/local/bin/frpc -c /etc/frp/frpc.toml
Restart=always
RestartSec=5

[Install]
WantedBy=multi-user.target
VPS/server
Create and edit /etc/systemd/system/frps.service:
[Unit]
Description=FRP Server
After=network.target

[Service]
Type=simple
ExecStart=/usr/local/bin/frps -c /etc/frp/frps.toml
Restart=always
RestartSec=5

[Install]
WantedBy=multi-user.target
Configuring FRP
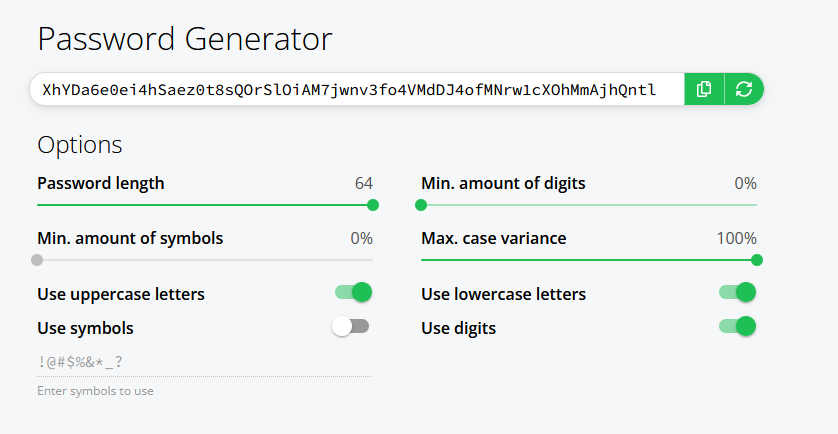
Make up or generate a relatively strong password. I recommend using this generator because it's what I used:
Create a configuration directory:
mkdir -p /etc/frpVPS/server
Create and edit /etc/frp/frps.toml:
bindPort = 7000

[auth]
method = "token"
token = "CHANGE_ME" # generated password
Refresh systemd daemons and start the server:
systemctl daemon-reload
systemctl enable --now frps.service
systemctl status frps.service
Homelab/client
Create and edit /etc/frp/frpc.toml:
serverAddr = "1.2.3.4" # Your VPS's IP address
serverPort = 7000

[auth]
method = "token"
token = "CHANGE_ME" # generated password

[[proxies]]
name = "minecraft-tcp"
type = "tcp"
localIP = "127.0.0.1"
localPort = 25565
remotePort = 25565

# If you have a voice chat mod/plugin
# installed, you might also want to forward
# its port; here's an example for SimpleVoiceChat
[[proxies]]
name = "minecraft-vc-udp"
type = "udp"
localIP = "127.0.0.1"
localPort = 24454
remotePort = 24454
Refresh systemd daemons and start the server:
systemctl daemon-reload
systemctl enable --now frpc.service
systemctl status frpc.service
Checking it out
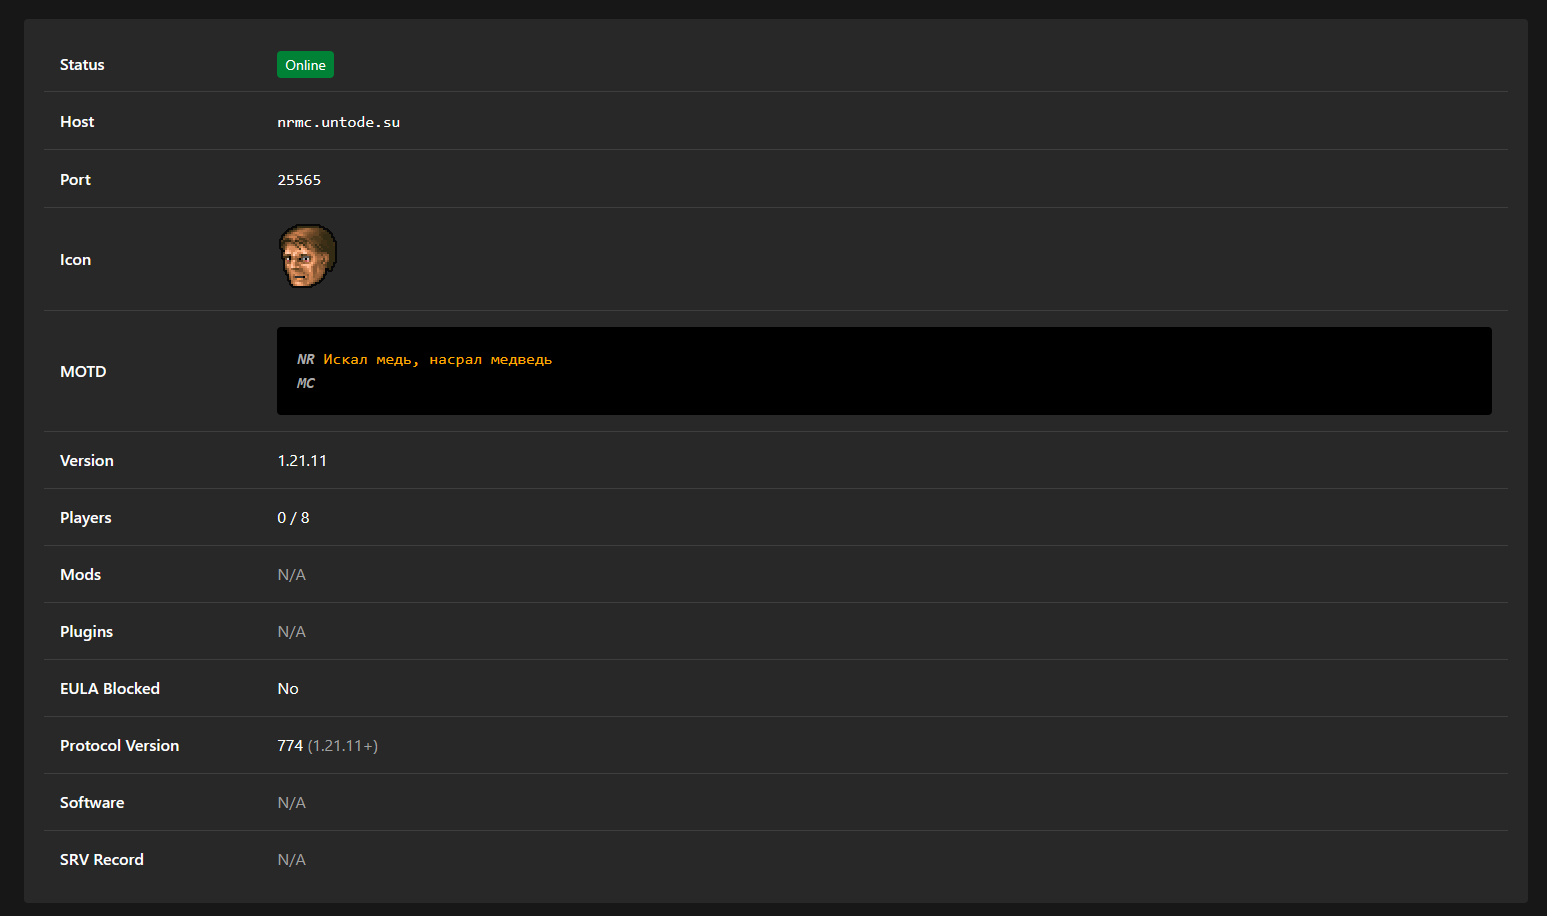
At this point the server should be accessible and playable via the public address that you aren't afraid to expose to the public:
Installing Drasl
Since the server is now hosted right-smack in the middle of Russia, it's not out of the picture that either outside or inside enemy might throw a fit and make Mojang servers inaccessible to all Russians. Annoying!!
So here comes Drasl, a Mojang auth API implementation; I installed it on the VPS, though it should be trivial to do the same on the home server and just proxy TCP on 443 port via FRP...
Setting up Docker
apt-get update
apt-get install -y ca-certificates curl
install -m 0755 -d /etc/apt/keyrings
curl -fsSL https://download.docker.com/linux/debian/gpg -o /etc/apt/keyrings/docker.asc
chmod a+r /etc/apt/keyrings/docker.asc

echo \
  "deb [arch=$(dpkg --print-architecture) signed-by=/etc/apt/keyrings/docker.asc] \
  https://download.docker.com/linux/debian \
  $(. /etc/os-release && echo "$VERSION_CODENAME") stable" | \
  tee /etc/apt/sources.list.d/docker.list > /dev/null

apt-get update
apt-get install -y docker-ce docker-ce-cli containerd.io docker-buildx-plugin docker-compose-plugin
Setting up Drasl directories
mkdir -p /usr/local/etc/drasl /usr/local/share/drasl/usr/local/etc/draslwill contain Drasl configuration;/usr/local/share/draslwill contain Drasl's database and other stuff;
Configuring Drasl
Create and edit /usr/local/etc/drasl/config.toml:
Domain = "drasl.example.com"
InstanceName = "drasl.example.com"
BaseURL = "https://drasl.example.com"
ListenAddress = "0.0.0.0:25585"
DefaultAdmins = ["CHANGE_ME"] # your username
ForwardSkins = true
SignPublicKeys = false

[RegistrationNewPlayer]
Allow = true
RequireInvite = true

[RegistrationExistingPlayer]
Allow = true
RequireInvite = true

[ImportExistingPlayer]
Allow = true
Nickname = "Mojang"
AccountURL = "https://api.mojang.com"
SessionURL = "https://sessionserver.mojang.com"
SetSkinURL = "https://www.minecraft.net/msaprofile/mygames/editskin"
RequireSkinVerification = false

[[FallbackAPIServers]]
Nickname = "Mojang"
AccountURL = "https://api.mojang.com"
SessionURL = "https://sessionserver.mojang.com"
ServicesURL = "https://api.minecraftservices.com"
SkinDomains = ["textures.minecraft.net"]
CacheTTLSeconds = 60

[[FallbackAPIServers]]
Nickname = "Ely.by"
AccountURL = "https://account.ely.by/api"
SessionURL = "https://account.ely.by/api/authlib-injector/sessionserver"
ServicesURL = "https://account.ely.by/api/authlib-injector/minecraftservices"
SkinDomains = ["ely.by", ".ely.by"]
CacheTTLSeconds = 60
NOTE: make sure to replace
drasl.example.comwith a domain you want to use for the Drasl instance.
NOTE: if you provided a default admin username, register it immediately; just in case someone smart is going to mess with you...
This configuration does the following:
Allows registering new players but only via an invite link;
Allows importing players from different auth servers to preserve their UUIDs, specifically enables importing from Mojang servers;
Defines Mojang API as a fallback, allowing regular users (that use either an official launcher or a launcher that only supports Mojang API) to seamlessly authenticate on your server;
Defines ely.by as a fallback API server for skins but disallows authenticating using it;
Docker-Compose
Create and edit /usr/local/etc/drasl/docker-compose.yml:
services:
  drasl:
    image: unmojang/drasl
    restart: unless-stopped
    ports:
      - "127.0.0.1:25585:25585"
    volumes:
      - /usr/local/etc/drasl:/etc/drasl
      - /usr/local/share/drasl:/var/lib/drasl
Start the container:
docker compose -f /usr/local/etc/drasl/docker-compose.yml up -dSetup a reverse proxy (nginx way)
NOTE: I used Nginx, but you might want to use a different HTTP/S server, so refer to its own specific documentation for this!!!
NOTE: replace
drasl.example.comwith the domain name specified in the configuration
NOTE: this assumes you use certbot to acquire a TLS certificate for the domain you chose, and in fact you did this BEFORE adding the proxy_pass configuration; refer to certbot's documentation for details!!!
Create and edit /etc/nginx/sites-available/drasl.example.com:
server {
    listen 443 ssl;
    listen [::]:443 ssl;
    server_name drasl.example.com;

    ssl_certificate /etc/letsencrypt/live/drasl.example.com/fullchain.pem;
    ssl_certificate_key /etc/letsencrypt/live/drasl.example.com/privkey.pem;
    include /etc/letsencrypt/options-ssl-nginx.conf;
    ssl_dhparam /etc/letsencrypt/ssl-dhparams.pem;

    location / {
        proxy_pass http://127.0.0.1:25585;
        proxy_set_header Host $host;
        proxy_set_header X-Real-IP $remote_addr;
    }
}

server {
    listen 80;
    server_name drasl.example.com;
    return 301 https://$host$request_uri;
}
Create a symlink:
ln -s /etc/nginx/sites-available/drasl.example.com /etc/nginx/sites-enabled/Check and reload Nginx:
nginx -t && systemctl reload nginxChecking it out
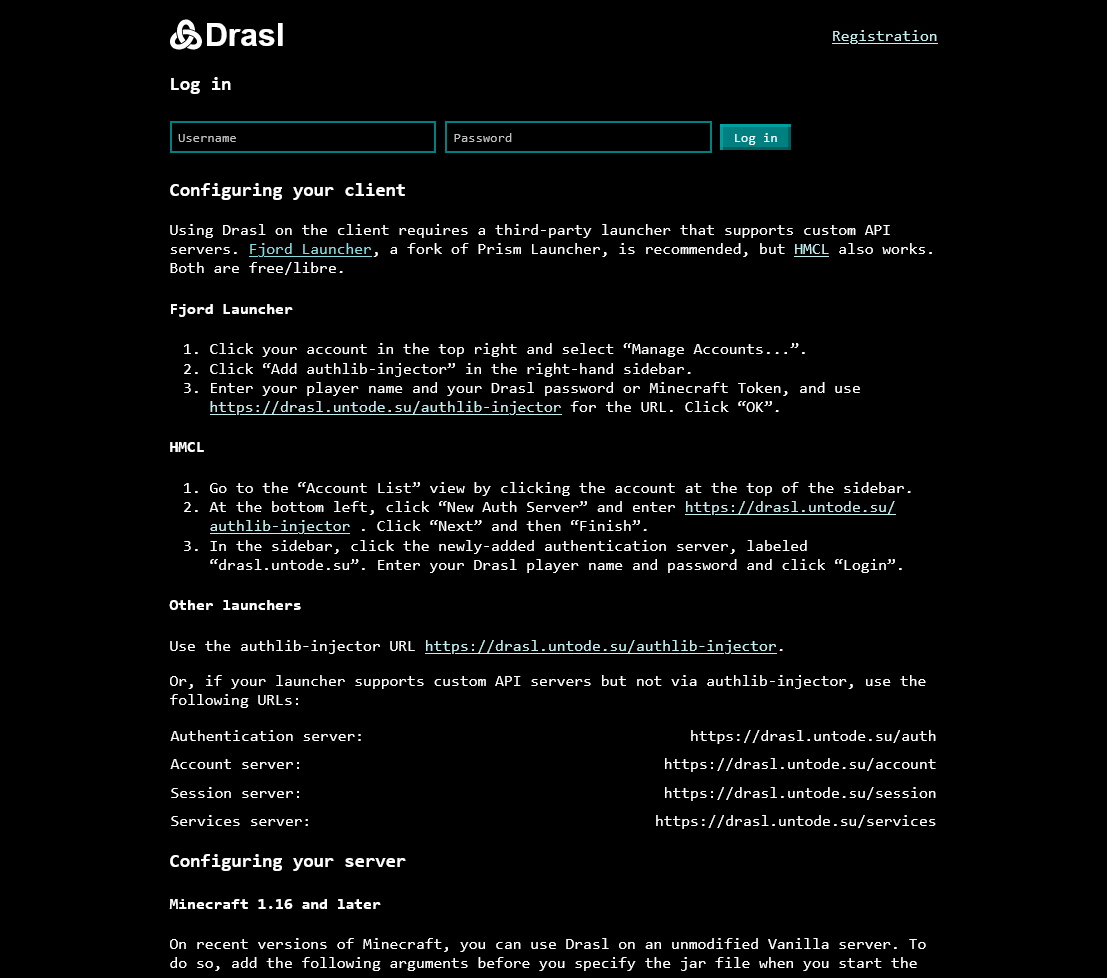
Follow you domain in the browser, you should see something like this:
Configuring the server
Overriding authentication servers is different for different Minecraft versions, so follow the instructions present in the homepage served by Drasl. For vanilla servers 1.16 and later the way to do it is via JVM arguments, just add these to your server's startup command or systemd unit:
-Dminecraft.api.env=custom
-Dminecraft.api.auth.host=https://drasl.example.com/auth
-Dminecraft.api.account.host=https://drasl.example.com/account
-Dminecraft.api.profiles.host=https://drasl.example.com/account
-Dminecraft.api.session.host=https://drasl.example.com/session
-Dminecraft.api.services.host=https://drasl.example.com/services
Also make sure online-mode=true is set in server.properties. Drasl implements the full session API, so you don't need to disable online mode.
Migrating Drasl to a new VPS
Since all player data lives in a SQLite database under /usr/local/share/drasl, migrating to a different VPS is entirely possible: stop the container, copy the config and database directories over, set up nginx and a fresh TLS certificate on the new machine, and you're done. UUIDs and skins should be intact...