Self-hosting a website with Nginx
GitHub Pages CDN seems to work slower compared to Cloudflare’s caching thing, so I kind of decided to self-host again, this time without trying to make the entire configuration file myself. Also I wanted to try using a different HTTP server and thus decided to go with nginx this time.
Getting a domain
It’s a wild west, I got my domain from a Russian registrar, you may get your domain literally anywhere else, including Cloudflare. I can’t recommend anything in that regard because there’s a lot of ways to get a domain.
Getting a server
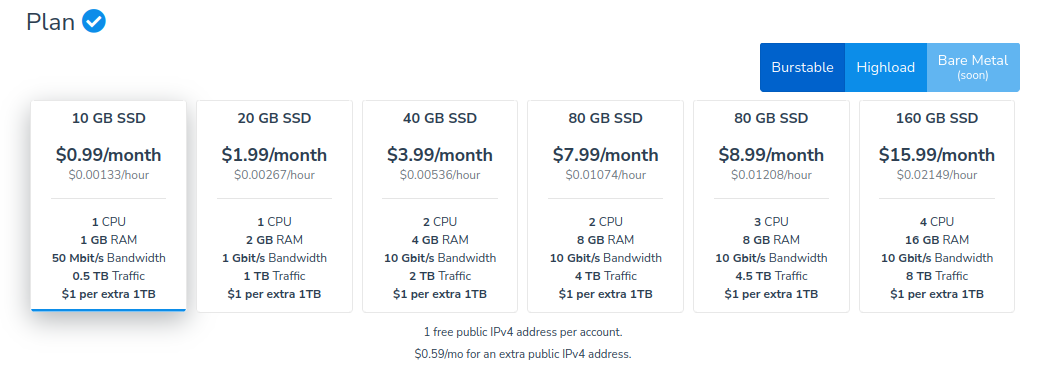
I keep shilling HostVDS because they offer good pricing for that server hardware they provide. The cheapest plan they provide is called hostvds-1 and it costs $0.99/month plus an additional cost for a dedicated IPv4 address (they give out one free IPv4 address per user, the next ones cost $0.60/month).
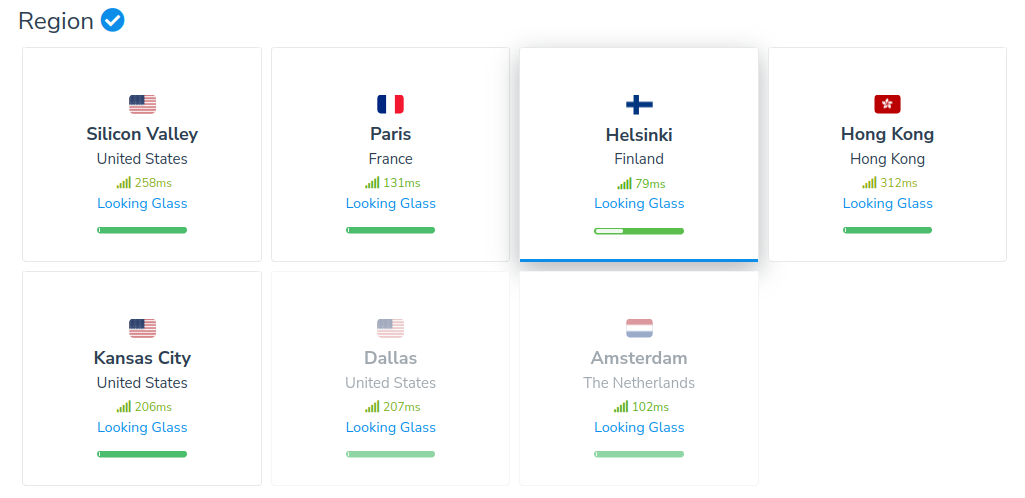
They also offer a number of locations you’re free to choose depending on where you expect most users to view your website from. I personally chose Helsinki because it’s one of the best locations to connect from literal middle of Russia.
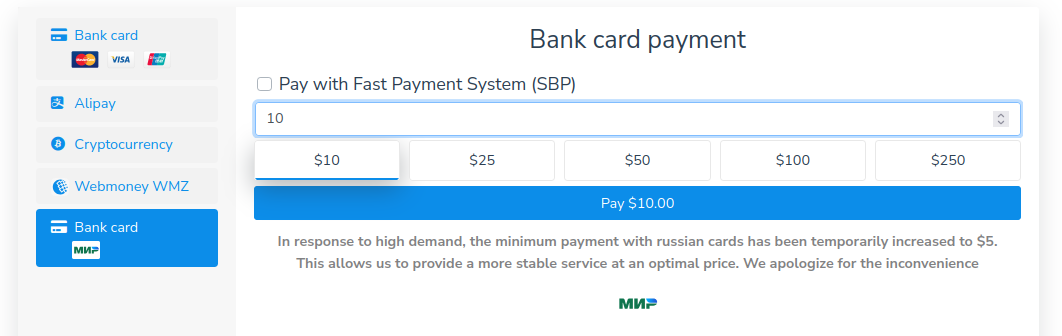
Oh and also they accept Russian payment methods, which is, like the only way I can get a remote server hosted outside of the country in the forseeable future. I have no clue on what’s the legal status of them doing this (you know, sanctions and all that) but I sure hope they keep accepting Russian cards.
Initial setup
Once you got your own server, I highly recommend you to do the initial setup which includes:
Debian antics
HostVDS Debian-based instances seem to scream at you during full system upgrades that your system doesn’t have zstd installed and instead they have to fallback to using
gzip.
I personally don’t like things falling back to something, so I installed zstd using the following commands:
apt update
apt install zstd -y
Full system upgrade
Host-provided OS images might not have important security fixes, so I recommend you do a full system upgrade and reboot the instance before doing anything else that might compromise your machine.
On a Debian-based distribution it is done with the following commands:
apt update
apt full-upgrade -y
systemctl reboot
SSH security
It is generally recommended you use a different port for SSH access rather than the default port 22. I also personally recommend you disable password authentication over SSH in favor of using an SSH public key for this. I am not going to do an in-depth explanation on how does one generate an SSH key because guides on that are already widely available
To do that, create a file at /etc/ssh/sshd_config.d/99-security.conf and insert the following lines, replacing the MY_SSH_PORT with the port you desire:
Port MY_SSH_PORT
PasswordAuthentication no
PubkeyAuthentication yes
PermitRootLogin yes
Make sure you allow incoming TCP connections on that port (using either an inside-machine firewall solution like UFW or adding an ingress rule forwarding the port in your hosting provider’s dashboard), then restart the SSH service, which on most systems (that use systemd) is done with the following command:
systemctl restart ssh
You still will be able to login using the root password using a web console most hosting services provide but in terms of remote access using SSH brute-force attacks will be close to impossible, if not impossble at all.
Installing Nginx
You can install Nginx manually or using a system package manager which is the recommended way. To do that on a Debian-based system, run the following command:
apt install -y nginx
Make sure you have the Nginx service enabled and running:
systemctl enable --now nginx.service
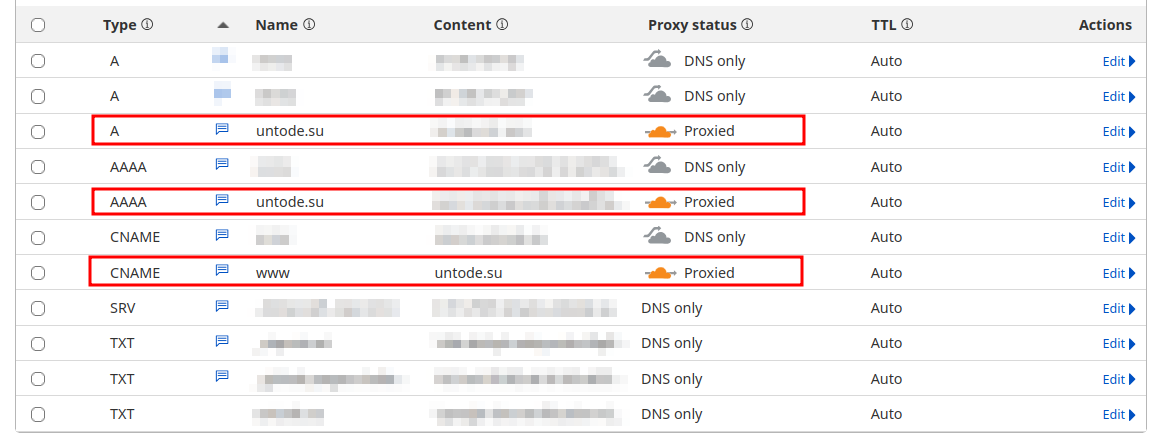
DNS setup
I’m using Cloudflare to manage my domain, which allows hiding the origin server’s IP address by proxying it through a Cloudflare’s own server. This also enables caching, origin server certificates and generally improves access times for the website.
-
Create an
Arecord that points to your server’s IPv4 address. If you’re using Cloudflare, make sure to enable proxying (the orange cloud thing) on the record. -
If your VPS also has an IPv6 address, create an
AAAArecord that points to the IPv6 address. Again, if you’re using Cloudflare, make sure to enable proxying on the record. -
If you also want to access the website using
wwwprefix, create aCNAMErecord that points to the desired domain name you defined by addingAandAAAArecords.
NOTE: enabling “orange cloud” in Cloudflare makes SSH connections by domain name impossible since the feature only passes HTTP/HTTPS ports through. If you use proxying, you’d have to enter the remote server’s address manually to connect to it.
The complete setup should look something like this:
Directory setup
Create a website directory:
mkdir -p /srv/www-mysite
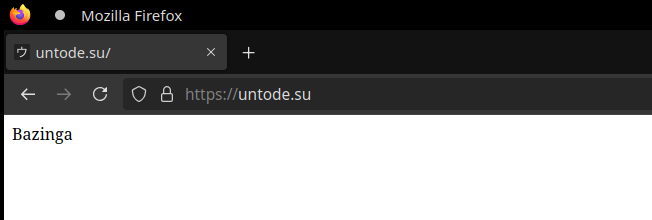
Make a test file to be displayed at your website:
echo "Bazinga" > /srv/www-mysite/index.html
HTTPS setup
Acquire a TLS certificate for your domain name. If you’re using Cloudflare, this can be done by issuing an Origin Server certificate. Alternatively, you can use certbot and acquire self-signed certificates.
Anyways, place (or create a symlink to files generated by certbot) certificate file origin_cert.pem and private key file private_key.pem in the /srv/www-mysite directory. After that, your directory listing should look somewhat like this:
-rw-r--r-- root root index.html
-rw-r--r-- root root origin_cert.pem
-rw-r--r-- root root private_key.pem
User setup
Create a website user. It really depends on what you want to do, but it’s useful to have a non-root user that would run commands to generate static content that would be displayed on the website:
useradd -d /srv/www-mysite -s /sbin/nologin www-mysite
Transfer directory ownership to the newly created user:
chown -R www-mysite:www-mysite /srv/www-mysite
Server setup
Create a file at /etc/nginx/sites-available/www-mysite and paste the following content into it, occasionally changing MY_ADDRESS to your desired domain name:
server {
    listen 80;
    listen [::]:80;
    server_name MY_ADDRESS www.MY_ADDRESS;
    return 302 https://$server_name$request_uri;
}

server {
    listen 443 ssl http2;
    listen [::]:443 ssl http2;
    ssl_certificate /srv/www-mysite/origin_cert.pem;
    ssl_certificate_key /srv/www-mysite/private_key.pem;

    server_name MY_ADDRESS www.MY_ADDRESS;
    root /srv/www-mysite;
    index index.html;
    charset utf-8;

    gzip on;
    gzip_types text/plain text/css text/javascript;
    gzip_proxied no-cache no-store private expired auth;
    gzip_min_length 1000;

    gunzip on;

    expires 24h;

    location / {
        try_files $uri $uri/ =404;
        add_header Cache-Control "public, no-transform";
        gzip_static on;
    }
}
Symlink the created file as /etc/nginx/sites-enabled/www-mysite:
ln -sf /etc/nginx/sites-available/www-mysite /etc/nginx/sites-enabled/www-mysite
Restart the web server:
systemctl restart nginx
The result
After all that, navigate to your site in the web browser. If everything goes right, you should be able to see the contents of a test file you’ve created: